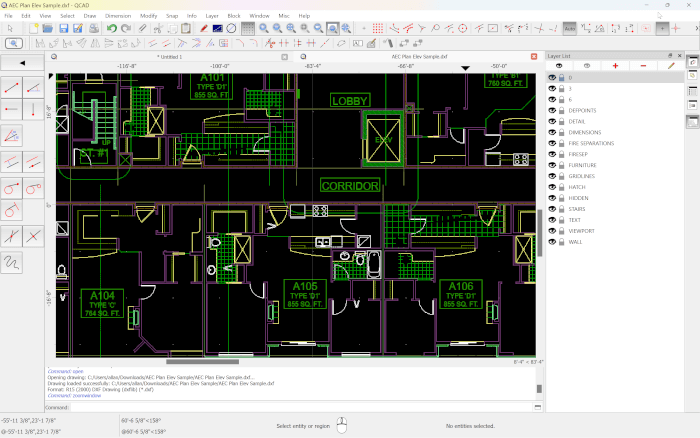
Blender 2.50 and YafaRay – Unofficial exporter script
A few days ago a new update to the development version of the upcoming Blender 2.60 was released. The Blender 2.50 Alpha 2 adds more features and tools for artists interested on testing what will be the future Blender 2.60. Even with lots of new features for modeling, most architectural visualization artists still find more use to Blender 2.49 for their projects, because we have a lot of scripts to help on modeling and rendering. Among those scripts we find the ones that integrate Blender with external renders like YafaRay and LuxRender. The use of such external renders is quite important for architectural visualization, because of the quality and realism of their images.
But, the first experimental script that allows a scene to be rendered with one of that software’s has appeared! An artist posted an experimental script that export a scene from Blender 2.50 Alpha 2 to YafaRay. The author of the script is called Silvio Falcinelli and the experimental script to export for YafaRay is posted here. The text is in Italian, but we can easily find the py file link to download. To make the script work, we have to copy it to the file to the \.blender\scripts\io folder of Blender. If you do that, a new option will be available at the render selector.

Another way to open the script is with a text window, by opening the text file and choosing Run Script from the Text menu.
Below we can find the options that will show up if YafaRay is set as the renderer for Blender 2.50:

The script doesn`t show all properties and features of YafaRay, but it`s a nice start and a way for those of you that can`t wait to create global illumination renderings from Blender 2.50. Like I said at the beginning of the article, the script is just an experiment and may not work well in some cases. Don`t even try to use it for production work! For that, the best option is to stick with Blender 2.49, or wait for an official script.
Until the documentation of the Blender 2.50 API is finished, there won`t be an official exporter for YafaRay or LuxRender.
Did I mention that the script only works with Blender 2.50 Alpha 2?
Mind map about 3d modeling for a lecture or presentation
From my previous posts on the blog, where I always mention my experiences on the classroom, you may be aware that besides my work with architectural visualization I also teach. I do teach Blender classes, but also work on classes about general computer graphics and multimedia design. For all those classes I use the same technique to plan and organize my speech. Since I know that lots of artists have to, at some point, make a presentation or lecture about a technique or tool, and I found it really hard to set the right sequence on my first times, I will share an image that might help anyone willing to give a presentation about 3d modeling.
I use a technique very simple, yet powerful to organize my thoughts and subjects of my lecture called mind maps. It`s a simple image that connects a series of keywords and images. Here is my mind map for general 3d modeling, for a computer graphics class.
Click on the image to see it bigger.
As you can see from the mind map, I start with a brief presentation about some of the modeling types available. Along with the topics I mark the most important subjects with small icons and flags, to expand a bit more the subject during the lecture. Of course, along the presentation I show to the students a lot of images and videos to demonstrate the techniques.
This is for a general 3d modeling lecture, and for other classes like one about architectural visualization modeling I work with minor changes, like the replacement of sculpt modeling to CAD support or other specific subjects. It will all depend on the main objective of the course and interest of the audience. At the end of the class, I add a few key terms for 3d artists that they should know in a quick glossary.
The original mind map was created in Portuguese for the class, and I translate the structure to post here on the blog. I hope you can find it useful and guide you through a presentation or lecture about 3d modeling. With time, I will post other mind maps about computer graphics.
Interior rendering for architecture with Blender and YafaRay
From all the renderers available for Blender, YafRay/YafaRay is one of the oldest options to render projects with advanced raytracing options in Blender, and it is one of the best companions for architectural visualization artists that use Blender. In my previous articles here in the blog, you may have notice that YafaRay wasn’t showing up too much lately. Most of the news was related to GPU Render technology or LuxRender. Unfortunately GPU render is still a project for YafaRay, listed as an idea for the SoC 2010. Leaving the GPU render aside, we can still consider YafaRay as one of the best options for architectural render in Blender.
I still use YafaRay for my external views and it works quite fast using Path Tracing. If you want to take a look at an interesting example of YafaRay applied to internal rendering, and learn a bit more about how it works, I just found out a great render created by an artist called tony, posted at the YafaRay user forums. The scene uses Photon Mapping to achieve the global illumination effect and the result is really cool. The image below shows the final result:
At the page on the YafaRay user forums we can find several images showing how the artist achieves the effect, including the scene setup and the Photon Mapping parameters. If you want to use the same settings on other projects, remember to make the proper adjustments for your scene and adapt the parameters for the scale of your project.
Besides the setup for the internal render, we can find a great way to create a carpet using the Displace modifier in Blender and the YafaRay material. A lot of artists try to create this type of object using particles and distribute geometry with instances. This is not wrong at all, but the final scene will have thousands of polygons just for a carpet. The result will be quite good in some cases, but for carpets like the one showed on the image, the displacement modifier and a texture will work just fine. And with the modifier we have a light weight scene!
Even for a short description and example, the scene will teach the use of the displacement modifier for experienced users, and for anyone interested on learn more about Blender and YafaRay for architectural visualization, it will show how to achieve realistic results for internal views.
Modeling for architecture: Scripts to automatically create 3d buildings
One of the primary tasks of an architectural visualization artist is to create a 3d model of an architectural project, in order to add lights and textures to create a realistic visualization of the building. Besides the main architectural project, we sometimes have to work on secondary 3d models or builds to compose the environment of the visualization. The need for secondary 3d buildings will depend on several aspects like the camera angle and site location. If the project site is not on an urban environment, there is a useful trick to hide the background of the rendered image, which uses lots of trees placed on key points to hide the background of the image. But, for urban environments the solution generates odd results.
As a matter of fact, it is almost certainly that we will need to create those buildings at some point.
The first option to create secondary buildings for visualization is to model them from scratch, but it would require too much time. Another way to add those buildings on visualization projects is with a few useful scripts that create procedural buildings, with only a few mouse clicks. There are options to create buildings for 3ds Max, Blender 3D and Maya.
For 3ds Max I found the Building Generator one the best options available, and we can create several details for the builds. I even made a small video showing how to work with the script.
Other option for Autodesk Maya is the KludgeCity that can create procedural buildings in a very similar way than Building Generator. The downside of this script for Maya is that all 3d models resemble commercial buildings only, but the levels of detail on the 3d models are incredible. The tool was created using MELScript in Maya.
And to finish the list, we have the Suicidator city generator for Blender 3D which can create buildings and urban environments with a few mouse clicks.
All tools are free to download and use, at least by the time I`m writing this article. They can be really helpful on the process of creating assets for background composing. And not only architectural visualization artists will like the tools, but game designers and animators will mostly enjoy the time saved.
Free external renderer for SketchUp: LuxRender with SU2LUX!
One of the most used tools to create rough studies and models for architectural visualization is SketchUp, because of the easy to use and speed in which we can create 3d models. So far, if we wanted to render a project designed with SketchUp and with photo real algorithms, we had to turn to commercial applications like the famous V-Ray, largely used with 3ds Max for architectural visualization or turn to tools like Maxwell Render, FryRender and Indigo Renderer. All of them are capable of generating great images, but for artists and students with few resources just Indigo offers a free version.
An option to use open source render engines like YafaRay and LuxRender, would be to use Blender as a middle-ware to import the 3d model and use of the exporters available with Blender to render projects. Well, at least for LuxRender this type of actions won’t be necessary anymore, since an user from the LuxRender forums announced the development of a script that connects SketchUp and LuxRender. The script is called SU2LUX and it can be downloaded right now from this link.
The script is already exporting meshes and a few material types like Mattes and Lights. Other tools will be implemented in time, but this is great news for SketchUp users and architectural visualization artists. At the same thread at the LuxRender forums we can find a few rendered scenes created with the exporter and LuxRender.
For artists used to get a full set of options to render with LuxRender in LuxBlend, the new script may look a lot simple, but it’s only the first version. In the proper time and hopefully with the help of other developers, the toll will look like LuxBlend when we talk about the number of tools available. One of the things I miss the most in this versions if the wide range of materials available in LuxRender, but it’s a start as a said.
If you are an architectural visualization artist and uses a lot SketchUp to create quick designs, this script and LuxRender may be a great solution to work on quick renders and visualizations as well. This is a powerful tool capable of use Unbiased render methods to generate realistic images, and it’s completely open source and free to use, which make LuxRender a great companion for SketchUp.


