

How to setup frosted glass in YafaRay and Blender 3D for interior design
The option available to setup glass in YafaRay is great and gives us a lot of flexibility to create several types of glass. A few days ago I showed how to setup colored glass for architecture, and today we will learn the process required to create frosted glass. This is a type of glass with a wide range of uses in interior design, especially for office environments. The trick to create frosted glass in YafaRay is the correct use of the Blender 3D procedural textures, which are supported by YafaRay to change the normals of the material.
Let`s take a look on how to setup the material in the scene below:

As you can see the scene is quite simple and only shows a few furniture models and an opening at the ceiling to allow the sunlight to enter in the room.
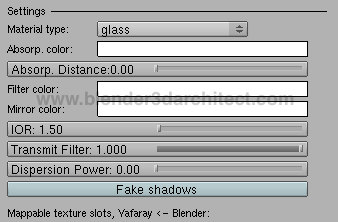
The cube select in the image will be used as a frosted glass plane. As a first step we have to setup a standard glass material of YafaRay for the plane.
At the texture panel in Blender 3D, add a procedural texture to the material and choose Clouds as the texture type. Setup the texture with the options showed in the image below:
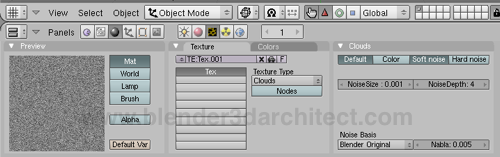
- Noise Size: 0.001
- Noise Depth: 4
- Nabla: 0.025
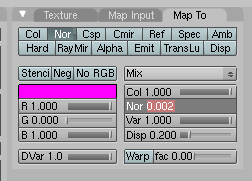
After that, go to the material panel and turn of the Col button and leave only the Nor button on, which will make the texture affect only the rendered normal. In my tests here, the Nor value should be very low to give a good effect on the frosted glass. For my scene I choose 0.002 as the Nor value, but we a value of 0.001 works fine too.
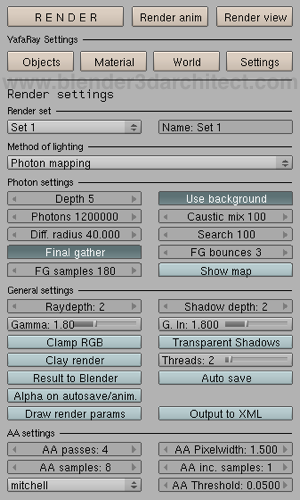
And that is it! The frosted glass material is setup. Since this scene is an interior view, I will use Photon Map as the render method for the example, with the following settings:
And the final result will look like these images, with the Nor values set to 0.001 and 0.002:

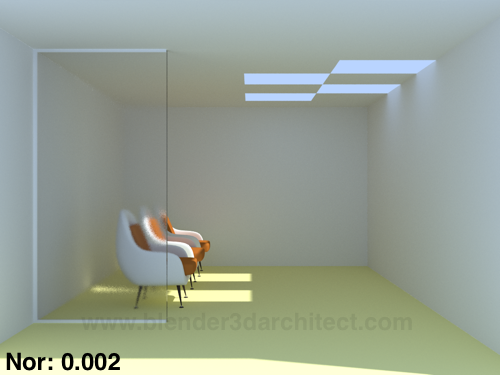
The result is quite good and represent this type of glass for architecture in a good way. I have to say that the render time for the scene with frosted glass is a bit longer, but the visual feedback worth the longer render time. If you want to know more about glass materials in YafaRay, I recommend a visit to this thread at the YafaRay user forums.
superb,its good idea for how to make a good frosted glass, verry thanks.
very organize information and you can learn many ideas once you read this post of this blog.
I would really like to know how you created the glowing frosted/milky panels in the ceiling. Could you please describe the blender/yafaray settings you used for this?
thanks,
Rob
.
Comments closed due to high levels of spam on this post.