

What is the best way to boost the productivity of a digital artist? Some people might say that getting better hardware, like a more powerful GPU or more memory. Those will bring a lot of benefits, are on the wish list of most digital artists.
But, there is something that could equally improve your productivity, not only in Blender but with everything related to digital art.
Getting an additional monitor to work with 3d modeling, animation, and rendering.
For people that still mainly works with a single monitor, making a move to a dual monitor setup will bring that feeling; how could I live without a second monitor?
Now, here comes an important question. How to use Blender with multiple monitors?
By holding down the SHIFT and click and drag with the left mouse button, at the right location will do the trick. If you use that in the top right or lower left corner of a window, it will detach the window from the Blender UI. You can set any view at the cloned window independently from all other windows.
After that, you can move the new window to a different workspace in your second or third monitor.
Do you want to go even further? Use the CTRL+ALT+W keys to duplicate all windows in Blender. It will work like a cloned UI.
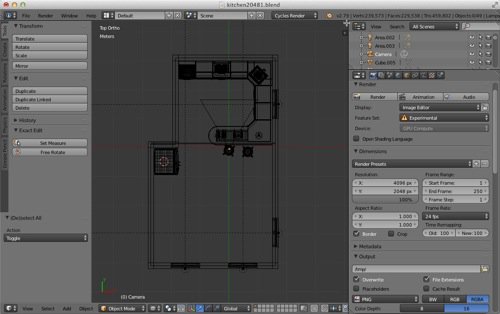
You can view an architectural model from any angle in one window, and have a completely different view in any other field.
For instance, you could see a project in the top view in one monitor and have a birdseye on another. Better yet, you can have a dedicated monitor only to view complex node materials for Cycles or Eevee.
In architectural visualization, you could use that to keep reference images at hand all the time, and craft better materials and work on lights. The list of benefits is endless.
Detaching windows in Blender is something that even experienced artists are unaware of Blender. Last week I showed that to an artist with five years of experience using Blender. And he didn't know about that. Don't have to say that shortcut blew his mind.

While you can open multiple windows, you will find that they get out of sync, each window uses different scene and screen properties, you want to add an info editor to the top of the extra windows to be able to change scenes. Most systems also require a click in each window to give it focus before it will respond to shortcuts. I prefer to keep one window spanning both monitors, changing scenes or screen layouts then effects the entire desktop. https://blender.stackexchange.com/a/21564/935
Currently, I don’t use multiple 3D-views, however; I did maximize the 3D-view on one monitor by tearing off the right side areas to another monitor.
To do this, hover the mouse in the upper left corner of the area until you get the cross-hair cursor. Use shift LMB drag to tear off the right side areas to separate windows on the second monitor. Then drag the lower right areas to minimize the upper areas.
Join all right areas into one: RMB click the border between area and select join from the dropdown menu. Repeat until you have only one right side area. I found it useful to change this one area to be the text editor.
Finally, RMB click the border between 3D-view and single (has to be only one) right areas. Select join from the dropdown menu. You should have the 3D-view full width
Once torn off, you can’t add areas to those windows or tear off additional windows. To do that, you have to tear off from the original window.
While it is possible to override the default layout using workspaces, I just save the project as normal. Then use that as a base template for future projects. I can then uniquely customize other things for each type of project.
As of the 2.8-1 (July 2019) release, it looks like this works without sync issues.
As Shane said above, it’s annoying if you need to click in a separate window to activate it before you can interact with it. You can change Windows’ behaviour by a registry tweak, which sets what is known as XMouse options (or ‘active window tracking’), and which then activates a window when you hover over it. However, this has 2 drawbacks:
1. You don’t want the ‘activate on hover’ behaviour during most of your interactions with Windows (believe me, it’s infuriating!)
2. You don’t want to have to edit the registry every time you want to change the XMouse settings.
One solution is to install a utility like WinAero Tweaker, which has a button to enable/disable the XMouse (otherwise known as ‘windows tracking’ ) behaviour.
Another, which I personally find more useful is to install AutoHotKeys, with a script to toggle XMouse status at press of a key combination. The script can be compiled to exe and set to run at startup, and just waits for the relevant keypress.
#NoEnv ; Recommended for performance and compatibility with future AutoHotkey releases.
; #Warn ; Enable warnings to assist with detecting common errors.
SendMode Input ; Recommended for new scripts due to its superior speed and reliability.
SetWorkingDir %A_ScriptDir% ; Ensures a consistent starting directory.
; Function: Toggles Active Window Tracking on or off
; Return Value: None
#z::ToggleActiveWindowTracking() ; set WinKey+Z to toggle the ActiveWindowTrackingStatus
; This function simply examines the state of the of the system variable which determines whether the
; window under the mouse pointer is automatically activated, and reverses the state.
ToggleActiveWindowTracking(){
; http://msdn.microsoft.com/en-us/library/ms724947%28VS.85%29.aspx
; SPI_GETACTIVEWINDOWTRACKING = 0x1000
; SPI_GETACTIVEWNDTRKZORDER = 0x100C
; SPI_GETACTIVEWNDTRKTIMEOUT = 0x2002
; SPI_SETACTIVEWINDOWTRACKING = 0x1001
; SPI_SETACTIVEWNDTRKZORDER = 0x100D
; SPI_SETACTIVEWNDTRKTIMEOUT = 0x2003
Static SPITrack := 0
Static SPI := “User32.dll\SystemParametersInfo” ; store the name of the API function we need to call
DllCall(SPI, “UInt”, 0x1000, “UInt”, 0, “UIntP”, SPITrack, “UInt”, False) ; get the current state of the system
SPITrack := !SPITrack
DllCall(SPI, “UInt”, 0x1001, “UInt”, 0, “Ptr”, SPITrack, “UInt”, False)
return
}