Customize Consent Preferences

We use cookies to help you navigate efficiently and perform certain functions. You will find detailed information about all cookies under each consent category below.

The cookies that are categorized as "Necessary" are stored on your browser as they are essential for enabling the basic functionalities of the site. ... 

Always Active

Necessary cookies are required to enable the basic features of this site, such as providing secure log-in or adjusting your consent preferences. These cookies do not store any personally identifiable data.

No cookies to display.

Functional cookies help perform certain functionalities like sharing the content of the website on social media platforms, collecting feedback, and other third-party features.

No cookies to display.

Analytical cookies are used to understand how visitors interact with the website. These cookies help provide information on metrics such as the number of visitors, bounce rate, traffic source, etc.

No cookies to display.

Performance cookies are used to understand and analyze the key performance indexes of the website which helps in delivering a better user experience for the visitors.

No cookies to display.

Advertisement cookies are used to provide visitors with customized advertisements based on the pages you visited previously and to analyze the effectiveness of the ad campaigns.

No cookies to display.

Blender 4.2: Precise Modeling Workshop
Learning Resources →

One of the most common types of lighting that we have to simulate in 3d for architecture is made by a clear sky with direct sunlight. It is quite uncommon to be asked to place your project at a cloudy sky or even create a night render. From both examples, the one that you may have to produce some time is the night render. I never had any client asking me to create a render with a project during the night. But, in my classes I often use this as an exercise for my students to make them practice the setup of lights for a night render.

One of the easiest ways to create a night render is with a bit of post-production. If you want to follow an interesting procedure to make a render like this, I found this tutorial covering the production of a night render with SketchUp and Photoshop for architecture. The article was posted at Sketchupartists.org and was written by Alex Hogrefe.

night-Render-SketchUp-Photoshop.jpg

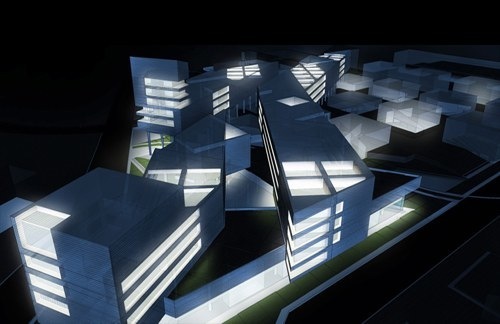
Besides the fact that most of the effect is create in the post-production stage, we can easily replace Photoshop with GIMP, since only simple tools from Photoshop are used to generate the effect.

Blender 4.3 for Complete Beginners (Workshop)
Previous

More architectural modeling tutorials with Blender 2.5

Next

How to work with UV Textures in Blender 2.5?

Leave a Reply

This site uses Akismet to reduce spam. Learn how your comment data is processed.

Check Also

Clicky