How to Create Arcs in Blender for Architecture Using the Spin Tool
A common frustration when using Blender for architecture is the apparent absence of an arc tool. If you have ever opened the Shift+A → Mesh menu and searched for an option to draw an arc, you already know the feeling — it simply is not there. For architects and designers migrating from Rhinoceros, SketchUp, or AutoCAD, this can feel like a dealbreaker. Arcs are fundamental to architectural drafting: curved facades, arched doorways, custom millwork profiles, and site boundary representations all depend on them.
The good news is that Blender can create precise arcs with exact radius and angle values. The feature exists, but it goes by a different name — the Spin Tool. In the tutorial above, we walk through the complete workflow step by step, comparing how arcs work in Rhinoceros and SketchUp before demonstrating the Blender method with a practical example. Watch the full video, or follow the text-based breakdown below as a reference you can search and return to while working in Blender.
Have you ever tried to create an arc with an exact radius and angle in Blender and couldn't figure out the workflow? Here is everything you need to know.
Why Arcs Matter in Architectural Design
If you work with design, interior design, engineering, or even 3D printing, arcs are unavoidable. At some point in nearly every project, you need a curved element with precise geometric control. Traditional CAD and 3D modeling tools recognize this and offer dedicated arc creation menus, sometimes with half a dozen variations — center-start-angle, three-point, tangent, and more.
In architectural practice specifically, arcs appear in floor plans for curved walls, in elevation drawings for arched openings, in site plans for road alignments, and in detail drawings for custom profiles. Without a reliable method to create them with exact dimensions, a tool loses credibility as a serious drafting option. This is one of the most common objections architects raise when evaluating Blender as a CAD alternative.
How Arcs Work in Rhinoceros and SketchUp
Before diving into the Blender workflow, it helps to understand what architects expect from an arc tool — because Rhinoceros and SketchUp set that expectation for most professionals.
Rhinoceros
Rhinoceros treats arcs as first-class drawing entities. Open the Curve menu, and you will find an entire section dedicated to arcs with multiple creation methods. To create an arc with a 7-meter radius and a 110-degree angle, you select the center-start-angle option, click to place the center, type 7 for the radius, and type 110 for the angle. The result is a true NURBS curve — smooth, precise, and ready for further editing.
SketchUp
SketchUp also provides a dedicated arc tool. Navigate to Draw → Arcs, where you will find options for a regular arc, two-point arc, three-point arc, and pie. Using the standard arc option, you can type 7 for the radius and 110 for the angle to achieve the same result. The key difference is that SketchUp generates a segmented mesh rather than a true curve, but the geometric accuracy is maintained.
Both tools make the process feel intuitive because the feature is exactly where you expect it to be, labeled exactly as you would expect. Blender takes a fundamentally different approach.
How to Create Arcs in Blender for Architecture
Here is the core technique. In Blender, you will not find a menu item called “Arc.” Instead, the workflow combines a Circle primitive with the Spin Tool in Edit Mode. The result is geometrically identical to what Rhinoceros and SketchUp produce — an arc with a precise radius and angle — but the path to get there requires a different mental model.
We will recreate the same example: a 7-meter radius arc with a 110-degree angle.
Step 1: Create the Starting Circle
- Press Shift+A → Mesh → Circle to add a circle primitive.
- In the operator panel at the bottom left of the viewport (press F9 if it has closed), change the Radius to 7 meters. This sets the radius of your future arc.
At this point, you have a full circle with the correct radius. Every vertex sits exactly 7 meters from the origin.
Step 2: Isolate a Single Vertex
- Press Tab to enter Edit Mode.
- Select one vertex on the circle.
- Go to Select → Invert (or press Ctrl+I) to invert your selection.
- Press X or Delete and choose Vertices to erase everything except your selected vertex.
You now have a single vertex positioned exactly 7 meters from the origin point. This vertex is the starting point of your arc.
[Figure: Single vertex remaining after deleting the rest of the circle, positioned 7 meters from origin]
Step 3: Use the Spin Tool to Generate the Arc
- Select the remaining vertex.
- Activate the Spin Tool from the toolbar on the left side of the viewport (or find it in Mesh → Spin).
- Click and drag to spin the vertex. You will see the arc forming in real time.
- In the operator panel, type -110 in the Angle field to set the precise sweep angle. The negative sign controls the direction of the arc — adjust the sign based on which direction you need the arc to sweep.
You now have an arc with a 7-meter radius and a 110-degree angle. The Spin Tool also lets you control the number of steps (segments), which determines how smooth the curve appears.
Verifying the Arc Angle in Blender
Trust but verify. After creating the arc, you may want to confirm that the angle is exactly what you specified. Blender offers two methods for this.
Method 1: Face Angle Overlay
- From the single vertex at the start of the arc, extrude an edge back to the origin by pressing E, then Shift+S → Selection to Cursor (assuming the 3D Cursor is at the origin).
- Select all vertices and press F to create a face.
- In the viewport header, open the Mesh Edit Mode Overlays dropdown and enable Face Angle.
- The overlay will display the angle directly on the geometry — you should see 110 degrees.
Method 2: The Measure Tool
- Select the Measure Tool from the toolbar.
- Click to place the first point of the ruler at one end of the arc.
- Click to place the second point at the other end.
- Click the midpoint of the ruler line and drag it to the arc center (origin) to create a bent ruler.
- The angle readout appears at the bend point.
Both methods provide immediate visual confirmation of your arc geometry without leaving Blender.
Blender vs SketchUp vs Rhinoceros: Arc Creation Compared
The fundamental difference is not capability but discoverability. Rhinoceros and SketchUp label their arc tools explicitly, making them easy to find for anyone with CAD experience. Blender achieves the same geometric result through the Spin Tool, which is a more general-purpose feature that happens to produce arcs when applied to a single vertex.
Here is how the three tools compare when creating a 7-meter, 110-degree arc:
- Rhinoceros: Open the Curve menu, select the arc type, specify center, type radius, type angle. The result is a NURBS curve.
- SketchUp: Select the Arc tool from the Draw menu, specify the radius, type the angle. The result is a segmented mesh arc.
- Blender: Create a circle with the correct radius, isolate one vertex, use the Spin Tool, and type the angle. The result is a mesh arc with configurable segment count.
The Blender workflow requires more steps, but it offers greater flexibility — you control the segment count, direction, and axis of the spin, all within the same tool. Once you internalize this workflow, creating arcs becomes second nature.
Frequently Asked Questions
Does Blender have an arc tool?
Blender does not have a dedicated arc tool in the Shift+A add menu. However, the Spin Tool in Edit Mode functions as an arc generator when applied to a single vertex. By setting a circle's radius first and then spinning one vertex to a specific angle, you achieve the same result as a traditional arc tool in Rhinoceros or SketchUp.
Can I specify an exact radius and angle for an arc in Blender?
Yes. Start by creating a circle primitive with the exact radius you need (set in the operator panel after adding the circle). Then, after isolating a single vertex and activating the Spin Tool, type the exact angle in the operator panel. This gives you complete numeric control over both parameters.
Is there an add-on that adds arc creation to Blender?
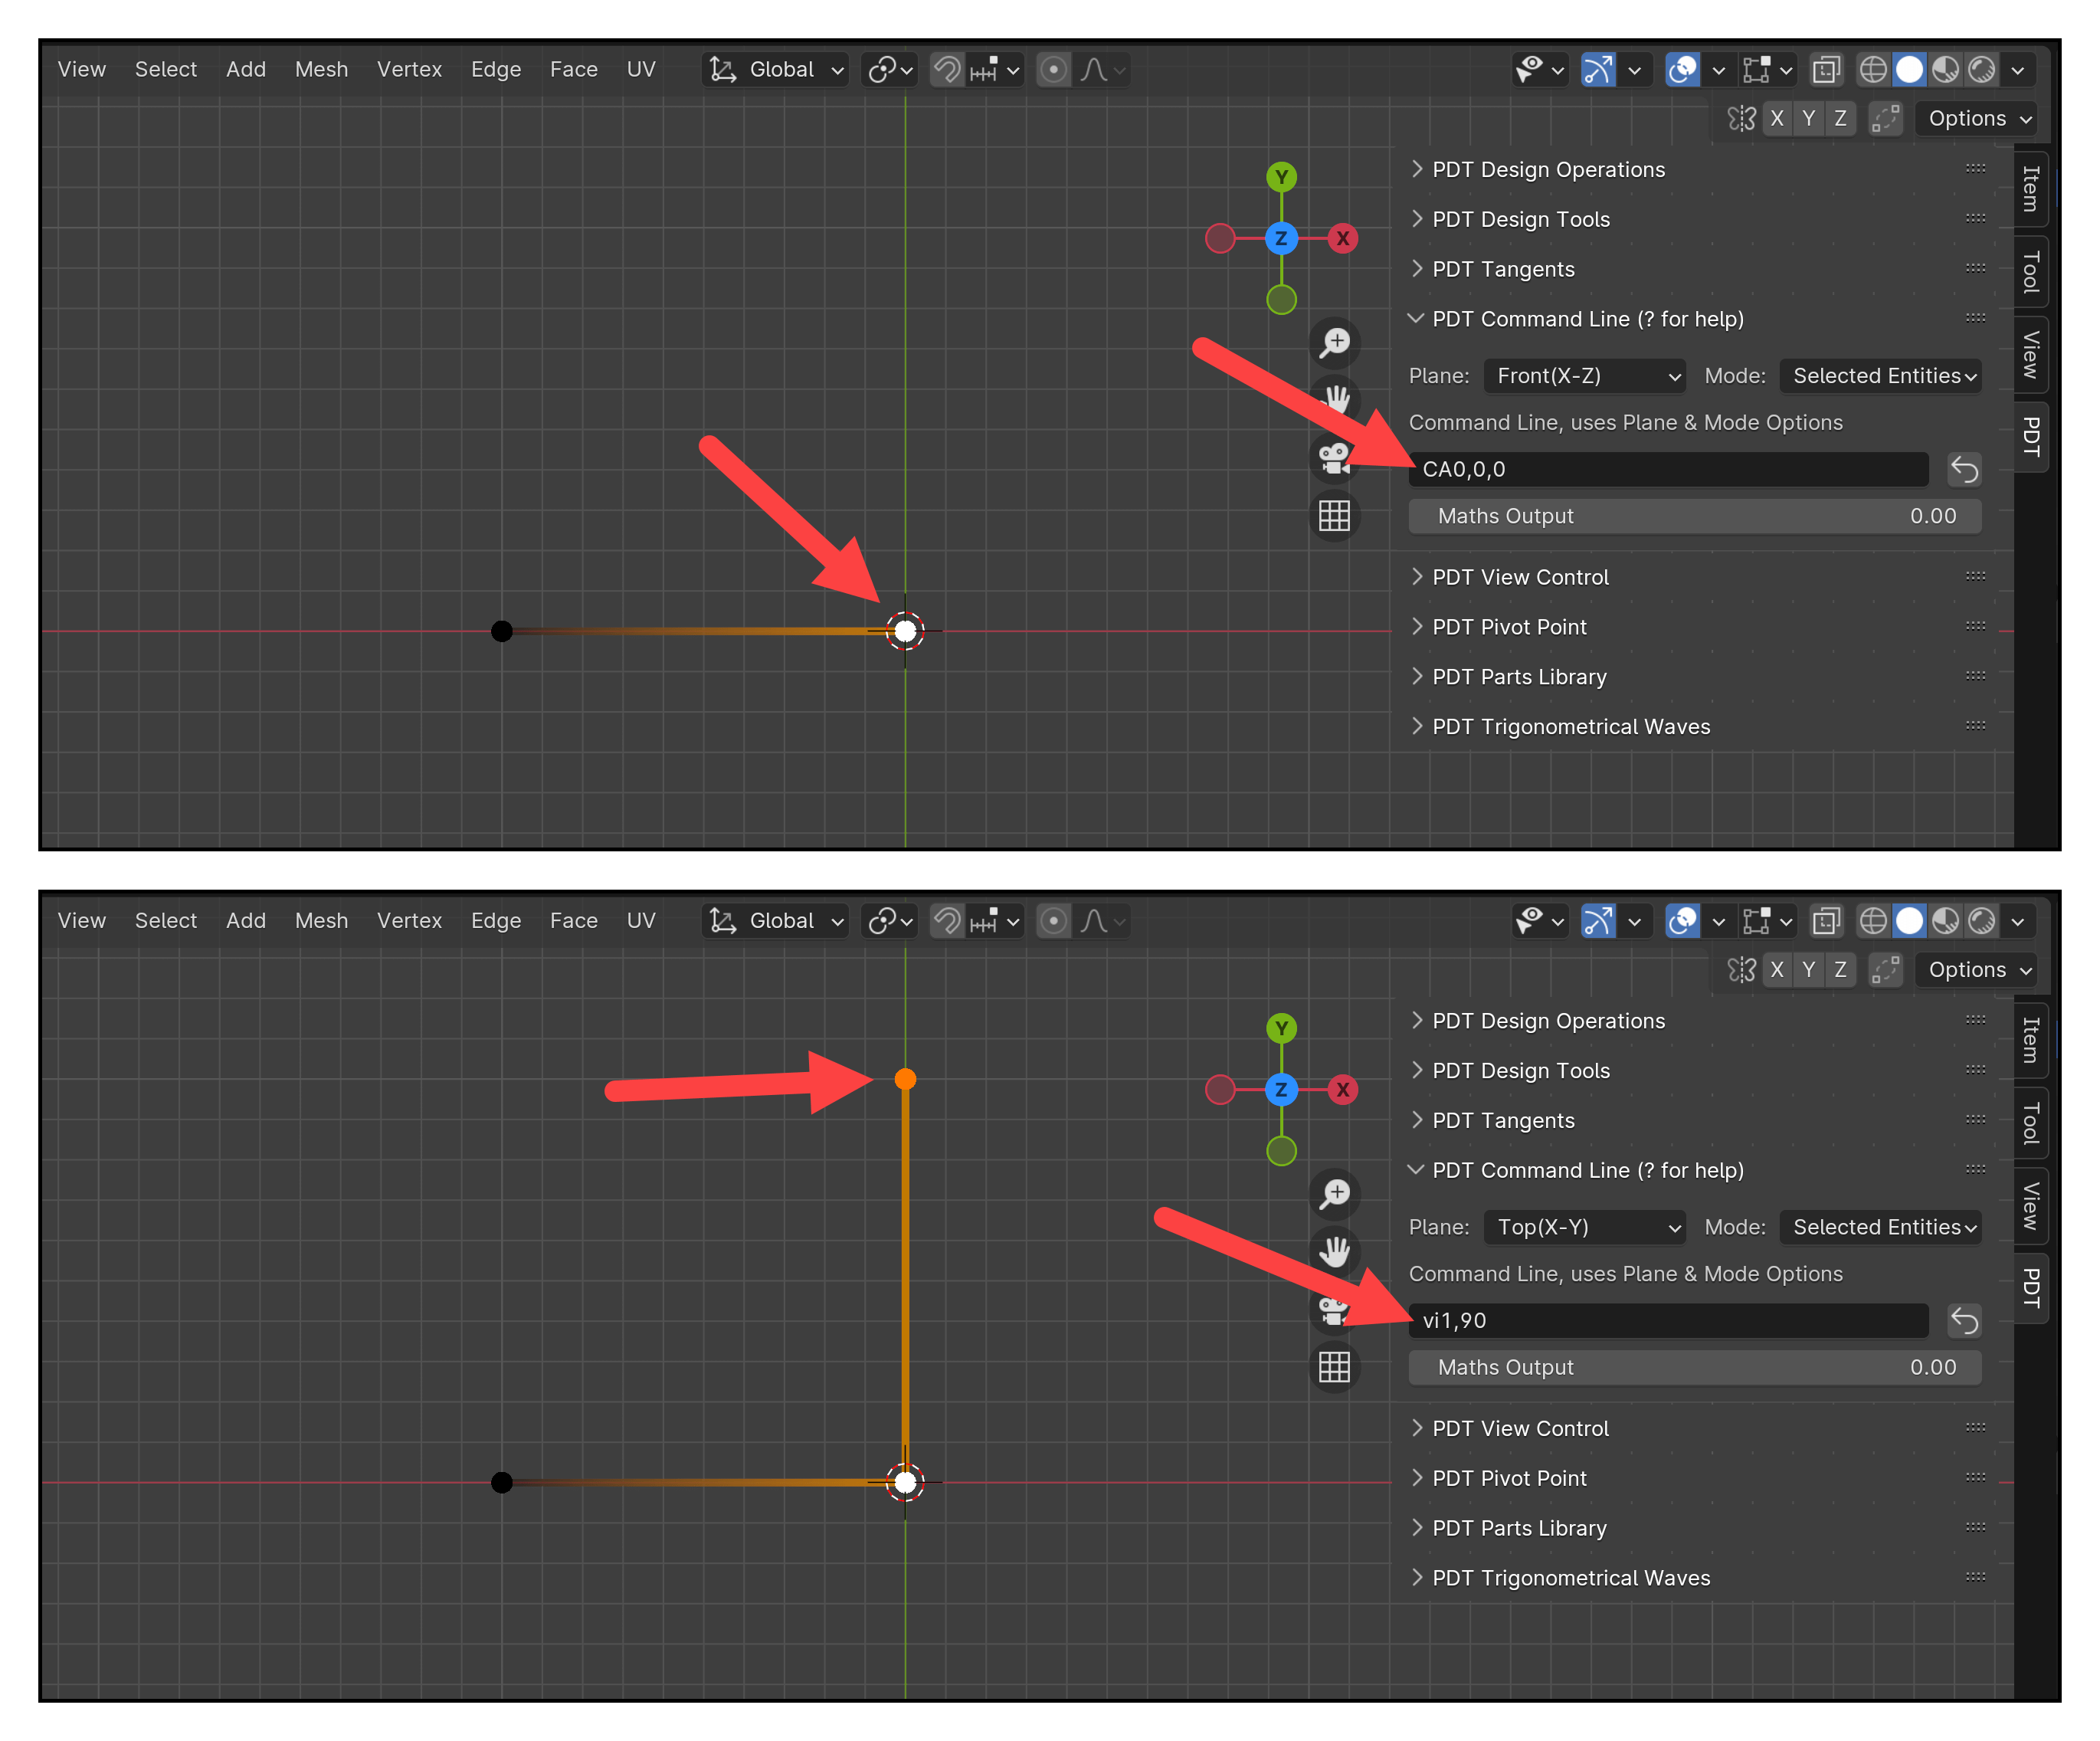
Several community add-ons exist to streamline CAD-like workflows in Blender, including the PDT (Precision Drawing Tools) add-on. However, the Spin Tool method described in this article requires no add-ons and works in any standard Blender installation. If you know a different method or add-on, share it with our community in the video comments.
How does the Spin Tool differ from drawing a NURBS curve arc?
The Spin Tool produces mesh geometry — a series of connected vertices and edges. Rhinoceros, by contrast, creates true NURBS curves, which are mathematically smooth at any zoom level. For architectural modeling and technical drawing purposes in Blender, mesh arcs with sufficient segments provide more than adequate precision, and they integrate seamlessly with the rest of your mesh-based Blender workflow.
Can I use this technique for 3D arcs, not just 2D?
Yes. The Spin Tool operates on whichever axis and plane you configure. While the tutorial demonstrates a 2D arc on the top (X-Y) plane, you can spin on any axis to create arcs in 3D space. This is useful for helical stairs, curved ramps, and other architectural elements that require three-dimensional curvature.
Practical Applications in Architecture
In professional architectural workflows, the ability to create precise arcs in Blender opens up a wide range of project types that many designers assume require a traditional CAD tool. Curved walls in residential floor plans, arched window and door openings in elevation drawings, and semicircular driveways in site plans all depend on arcs with exact geometric properties. Architects using Blender for architecture can now handle these elements with confidence, knowing that the Spin Tool provides the same level of numeric precision that Rhinoceros and SketchUp offer through their dedicated arc commands.
Beyond individual elements, mastering arc creation in Blender improves overall workflow efficiency for firms exploring open-source alternatives. When an architect can model a curved facade, verify its angle using the Measure Tool or Face Angle overlay, and proceed directly to rendering with Cycles — all within a single application — the case for using Blender for architecture modeling becomes significantly stronger. For teams evaluating SketchUp vs Blender for architecture, or Rhino vs Blender for architecture, the arc workflow is often the specific test case that determines whether Blender earns a place in the production pipeline.
Perhaps most importantly, understanding this technique helps architects avoid the frustration that causes many professionals to abandon Blender before they discover its full capabilities. The assumption that Blender lacks basic drafting features like arcs is one of the most common barriers to adoption. Once a designer learns that the Spin Tool is simply Blender's version of an arc tool — named differently but functionally equivalent — they can approach the software with renewed confidence and begin exploring the many other precision modeling features that make Blender a legitimate option for architectural design and technical drawing.
Learning Blender for Architecture
If you want to go deeper with using Blender as a precision drafting and modeling tool for architecture, we have several resources at Blender 3D Architect designed to help you develop these skills systematically. The arc technique covered in this tutorial is one example of the broader CAD-like workflow we teach across our learning materials.
Recommended Resources:
- Blender: Precise Modeling for Architecture, Engineering, and 3D Printing (Workshop) – Video series Blender 3D Architect Workshop on Udemy (9+ hours)
- Blender 5: Precise Modeling for Architecture, Engineering, and 3D Printing – Paperback and eBook
- Learn Blender 5: The Beginner's Guide – Paperback and eBook
Getting any of these resources will advance your skills and support our mission to make professional design tools accessible to everyone.