As you may be aware of the new tools and functionalities of Blender 2.50, one of the new features is the possibility to animate anything with the new and redesigned animation tools. Back in Blender 2.4x we had to work on a few tricks to create animations with modifiers parameters or other values, especially if those values weren`t available at the IPO Curve Editor. Sometimes the trick to animate a 3d model would involve hooks or lattices, but now it`s possible to really animate anything!
This last week one of my students asks me how to animate the parameters of a modifier. The objective was very simple and consists of creating an animation with the simple deform modifier. How to do that?
Since I believe that a lot of people may be with the same problem then my student, I decided to show up how to create this type of animation. It`s much simpler than you can imagine. For instance, if we had to work with the simple deform modifier, with the Twister mode activated. We want to create an animation where the object starts without the influence of the modifier, and with time it goes blending further more.
The secret to create this type of animation is to add keyframes to the modifier parameters. Just place the mouse cursor on top of the parameter and press the i key. It`s that simple. Of course, before that you should place the animation at the frame that you want the keyframe to be added. The video below shows how it works. Besides the tutorial, it`s my first attempt to post a tutorial in FullHD at Youtube.
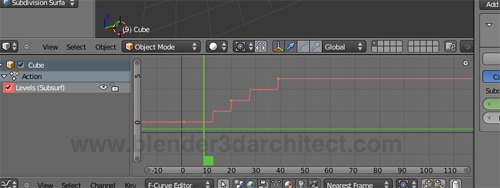
For other types of parameters like the levels of subdivision of the Subsurf modifier, we will not see a curve at the curve editor. It will look like the image below shows, a series of straight lines, because we can only use integer values for subsurf divisions.

This is the trick for all parameter that we want to animate with Blender 2.50.
In architectural animation we will use this type of trick to change parameters of the camera and the way we see certain materials and textures. I wonder if we will be able to add animation to the parameters of the exporters of YafaRay, LuxRender and Indigo Renderer? By now, we still have to wait to test it.


Awesome. I’ve already tried animating text parameters, and look forward to seeing what all can be animated and to what use. Thanks!
Alright, read the whole post and saw the vid. The FullHD doesn’t do much for me, since my monitor can’t display the whole video that big, and it plays back slower. But the animation features are great!
THANK YOU SO MUCH!!!! I’ve been trying to figure out how to do this forever!
VERY slick feature and nicely done video demonstrating it! I’m used to automating control parameters in audio composition software but never imagined the flexibility of having something similar in Blender! Similarly it would be nice to see Blender’s parameter control perhaps have the option of using one of a few generic math functions like “random”, “sine”, etc?
Wow, awesome. Had no idea. Thanks for sharing!
Wow, Thanks a lot!! Can’t believe it was that easy 😛
How can we save the my project form of video? Please