

I know, at this point you may say that this is old news, but it I still believe that the release of a stable version of YafRay, is a huge milestone for anyone working with Blender 3D for architectural visualization. Before anything, visit the YafRay web site to download a version of YafRay and start to use it! What`s the big deal about YafRay? Well, ever since I started to use Blender 3D as my main tool for visualization I began to use YafRay as my render engine as well. I had some advanced ray tracing options that weren't available for Blender at the time.
What`s the story behind this release? If you want to know this kind of details, I recommend the reading of this article, which explains the origins of the name YafaRay.
This version of YafRay, also called YafaRay was under development since mid 2006, when it was first announced to the community. Since it was under development, I choose not to use it for production, and only test it with a few scenes and wait until a stable release. While I was waiting, another render engines come to my attention like Indigo and LuxRender, but YafRay is the render that has the best integration with Blender, and of course, it`s open source.
Do you want to see an example of how YafaRay can help, artists working with architectural visualization? Let me show a simple example, related to cameras.
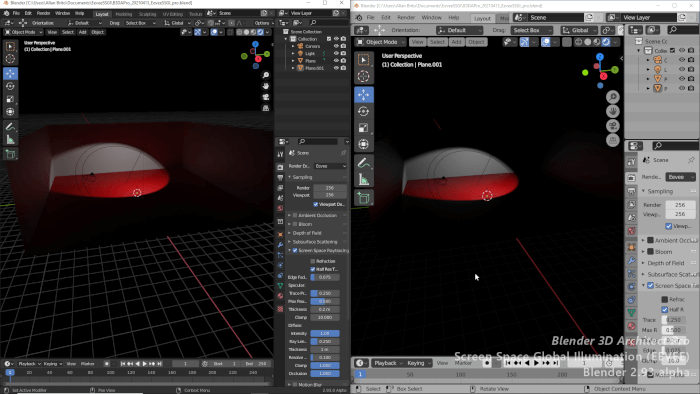
In this scene, we have a camera placed near the ground plane, and since the target of this camera is aimed to the top of the objects, we have a slight distortion in the perspective lines:


How to fix that? The new YafRay has several types of cameras, and one of them is called architect. If we select the camera, and change the camera type to architect, like the image below shows:

This is the resulting render:

The vertical lines of the perspective are not distorted by the differences between the camera origin and target!
With this new release, I`m working on a few tutorials and guides about the use of YafRay 0.1.0 for architectural visualization! Stay tuned for more articles in a few days.
In the mean time, you can visit the YafRay Wiki to find out more tutorials and guide about the installation and use of YafRay 0.1.0.

Great. I didn’t know this new feature in Yafray. Thanks for the tip. Waiting your tutorials.
And never really thought of using YafRay…..until now! (This is a different Juan by the way).