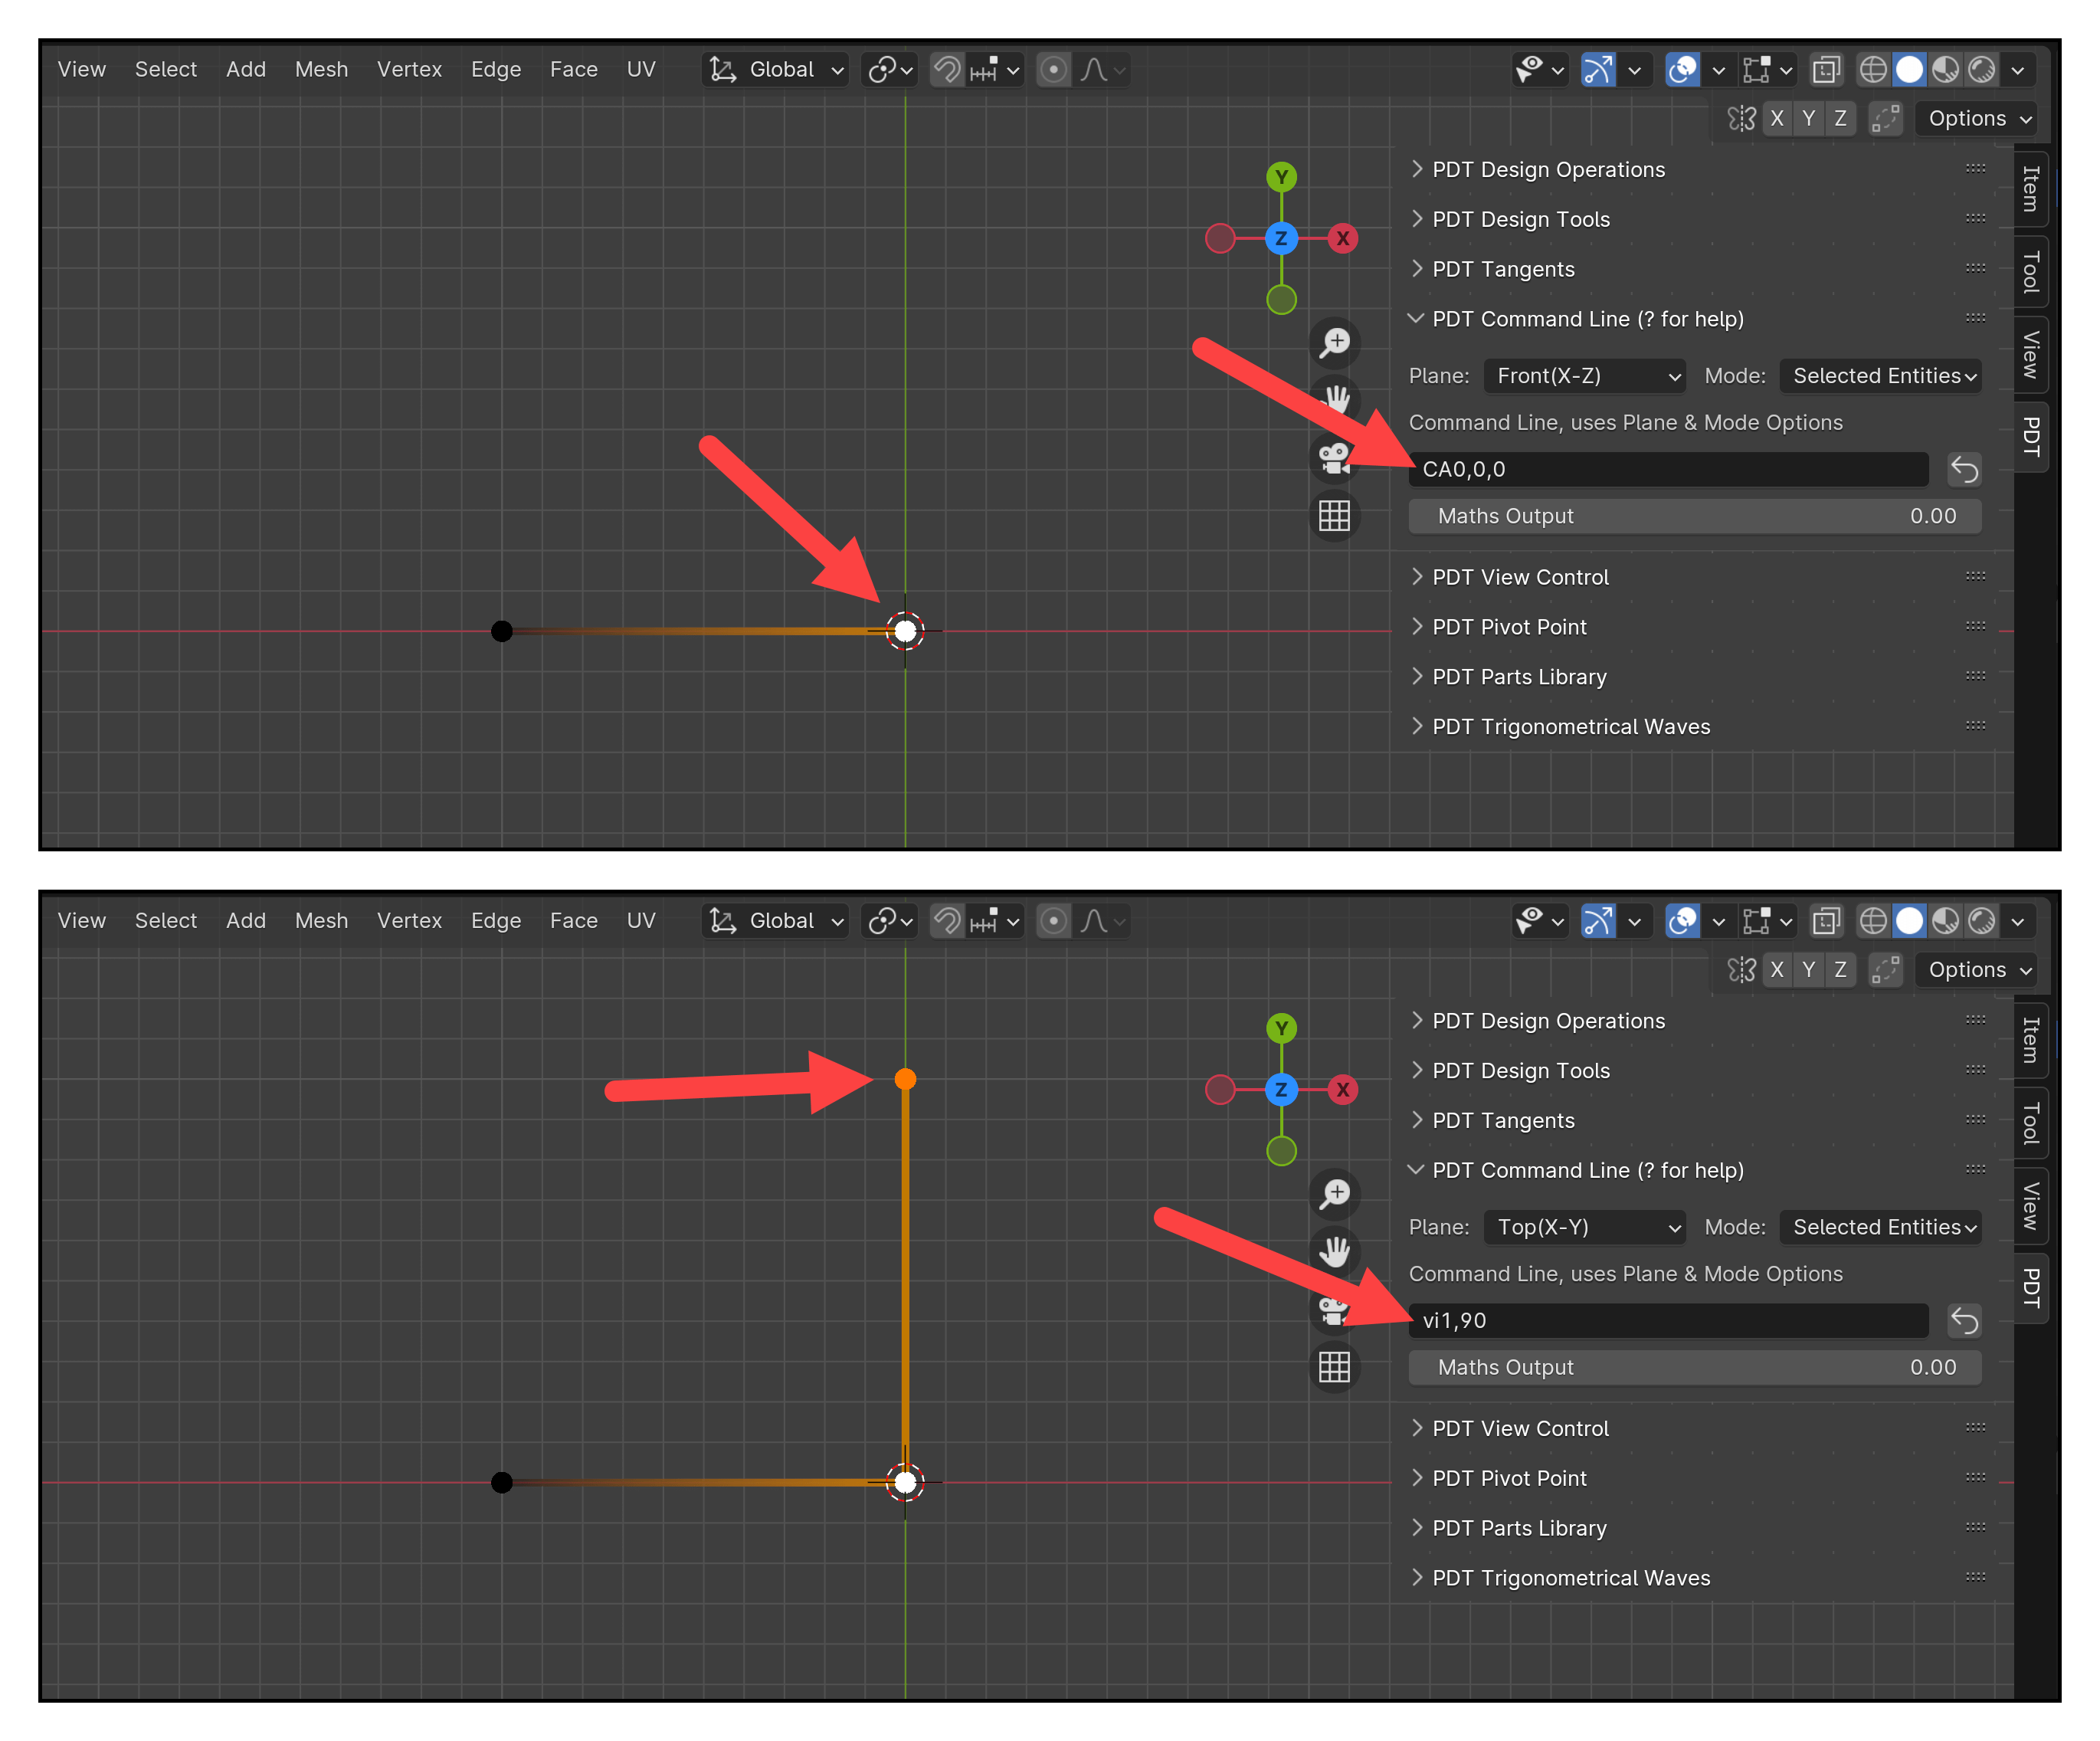
google
yahoo
bing

Project Butterfly: Free web based AutoCAD?

Let`s take a small break on the GPU rendering articles and go to another trend, this time is about internet. We have a bunch of applications been released this days with online versions like office suites and even illustration tools like the amazing Sumo Paint. A few weeks ago I have showed a project from Autodesk called Dragonfly, using Flash to bring a quick interior design tool with the ability to add and see objects and scenes in 3d. This is an example of what could be accomplished using only web based applications.

Well, this week I found out about another project from Autodesk that has a more complex goal, which is to create a simple version of AutoCAD running on a web browser. This project is called Autodesk Butterfly.

If you don`t want to visit the project web site, they have an introductory video explaining how it works:

Despite the fact that I had a few problems launching the application on my Mac OS X, the software worked out really great on a windows machine, using both Firefox and Chrome. So far, the project has only a few tools and it`s aimed on the visualization and collaboration between team members. A quick look on the interface will reveal only a few drawing commands, but a lot of tools for visualization.

This is a great idea for users that don`t want to install a DWG or DXF viewer on their computers, only to show of a few ideas to a client or even work on a new computer. The solution to send technical drawings to clients so far, involves the use of PDF files or other ways to allow someone without CAD experience to view the projects.

If the project remains a free web based application it could work as a true solution to view CAD files. For instance, we would be sending a link to a client instead of a big PDF file. I would love to evaluate academic projects using an online tool like this too; it would make the life of teachers a lot easier.

News about GPU rendering with LuxRender, YafaRay, iRay and Maya

In the past few days a lot of interesting news and demos about GPU rendering appear o twitter and user forums. It`s quite clear that after the announcement of Octane Render and Arion, we will start to see even more releases related with GPU render. I will start with the announcement of a GPU render dedicated for Maya, called FurryBall and it`s based on Path Tracing algorithms just like other solutions, which results in quite good rendering and GI quality. The video below shows a quick demo of the software running in Autodesk Maya and manipulating a 3d car model, with a good level of detail. It works in a similar way than V-Ray RT inside 3ds Max.

The second demo I want to show involves LuxRender and the production of animation with the software. If you may have already tried to create animations with LuxRender, you may know how time consuming it might be. For each frame of the animation we have to spend a great amount of time to get a noise free image, or use a lot of computers in a render farm. With the new experiments on LuxRender and GPU Render, we can expect to create animations using complex materials like glass in a very short time. Here is an example of simulation using the Bullet Physics to create the interactions between objects and LuxRender:

Now, let`s take a look on a demo of iRay from Mental Images. A friend asked me a few days ago if he could use one of those GPU based renders as their main software to create photo realistic images. Well, the next video shows the result of an image rendering during 15 minutes with iRay. Of course, the video has only 15 minutes in length, because it`s in timelapse format. But, we can see the result after all that time and the quality of the image.

And to finish the assorted group of news and demos on GPU rendering, you might be asking yourself when we will see YafaRay to get a GPU render modele? Well, they just posted a page with ideas for Google Summer of Code 2010, and one of them is the use of GPU to speed up the rendering. If you want to take a look and help with YafaRay GSoC 2010 ideas, visit this link. One of the projects is the integration between YafaRay and Blender 2.50. I really hope that they get at least one project accepted this year.

How to animate anything in Blender 2.50?

As you may be aware of the new tools and functionalities of Blender 2.50, one of the new features is the possibility to animate anything with the new and redesigned animation tools. Back in Blender 2.4x we had to work on a few tricks to create animations with modifiers parameters or other values, especially if those values weren`t available at the IPO Curve Editor. Sometimes the trick to animate a 3d model would involve hooks or lattices, but now it`s possible to really animate anything!

This last week one of my students asks me how to animate the parameters of a modifier. The objective was very simple and consists of creating an animation with the simple deform modifier. How to do that?

Since I believe that a lot of people may be with the same problem then my student, I decided to show up how to create this type of animation. It`s much simpler than you can imagine. For instance, if we had to work with the simple deform modifier, with the Twister mode activated. We want to create an animation where the object starts without the influence of the modifier, and with time it goes blending further more.

The secret to create this type of animation is to add keyframes to the modifier parameters. Just place the mouse cursor on top of the parameter and press the i key. It`s that simple. Of course, before that you should place the animation at the frame that you want the keyframe to be added. The video below shows how it works. Besides the tutorial, it`s my first attempt to post a tutorial in FullHD at Youtube.

For other types of parameters like the levels of subdivision of the Subsurf modifier, we will not see a curve at the curve editor. It will look like the image below shows, a series of straight lines, because we can only use integer values for subsurf divisions.

blender-250-animation-tutorial

This is the trick for all parameter that we want to animate with Blender 2.50.

In architectural animation we will use this type of trick to change parameters of the camera and the way we see certain materials and textures. I wonder if we will be able to add animation to the parameters of the exporters of YafaRay, LuxRender and Indigo Renderer? By now, we still have to wait to test it.

Update on NPR rendering for architecture with Freestyle

Before we start to work with photo real renderings generated by sophisticated softwares, the most used technique to show and represent architectural visualization projects was NPR, which is the acronym to Non-photorealistic rendering. The images were generated using techniques such as watercolor or airbrush. To use NPR style images in 3d softwares today we have to sometimes work on post production, with filters in image processing tools like Gimp or Photoshop. In Blender we have a project that want to integrate a NPR render engine called Freestyle to enable all Blender artists to generate easily NPR style images.

I already showed a few examples of Freestyle images here at Blender 3d Architect, and today I will talk a bit more about the project. In fact, one of the things that were really improved since the first time I tried a test build with Blender 2.50 and Freestyle was stability. In the first tests I hardly could render three or four images in a row. It always ends up with a crash. In the past few days I’ve downloaded more test builds from graphical.org and it all seem a lot more stable.

Let me show how Freestyle will work when it’s merged with Blender 2.50. It works as a Render Layer for Blender, and the option to turn it on is located there.

npr-render-architecture-freestyle-update-01

Even as an independent render engine, it won’t be located at the top selector of Blender 2.50.

Once it’s turned on, we can find the options to choose a profile right below the render layers. Select a profile with the type of lines that should be used for the NPR render. Pick anyone from the list of profiles that already comes with the build.

npr-render-architecture-freestyle-update-02

At the post production list we have to check Freestyle also, and hit F12 to render the scene. Here is the result of a render with a profile called cartoon and a few furniture models I have in my library:

npr-render-architecture-freestyle-update-03

npr-render-architecture-freestyle-update-04

Unfortunately it’s too soon to use any of those tools in production environments, because the stability of the software was improved, but it’s not perfect yet. With really complex scenes Blender still crashes by the time it starts to work with Freestyle on the rendering.

Modeling for architecture: Turning Torso from Santiago Calatrava

The process of creating architectural 3d models for visualization sometimes presents us a few challenges, mostly because of the shape of the project. In some cases it’s hard to construct in real life and in 3d as well, but in 3d we can work at an incredible speed. One of the subjects that I like the most in my classes about architectural modeling is to pick a great architect or project and use it as a subject for a visualization exercise, in which the students must model the entire building.

If there is one architect that can create cutting edge projects hard to build in real life and in 3d is Santiago Calatrava. I always loved his work, using shapes and structures that challenge constrictors. I have already used one of his projects in a modeling class. The project used was the Gare do Oriente in Lisbon. The metallic structure of the project is a great example of how to use tools like Array.

If you want to create a 3d model from Santiago Calatrava in Blender, I just found a great tutorial in video showing the technique to create a skyscraper designed by Calatrava. It’s the Turning Torso building in Sweden. The building is a challenge to anyone with few or no experience in 3d modeling.

Turning Torso F

HSB Turning Torso, Malmö

The tutorial was created by a user from the blenderartists forums called Ulfar. It’s divided into four parts that can be watched directly from Vimeo. Here are the links for all parts of the tutorial:

In the tutorial we won’t find the detailed process to create the full 3d model, instead of showing all the steps required, the author focus on the technique used to create a 3d model that looks like the Turning Torso.

If you are used to tedious projects for commercial architecture, this will be a great modeling challenge even for the most experienced users. I will point this video to my students and use the Turning Torso as a subject for a future class about architectural modeling, as a way to push the creativity of my class.