
Modeling an Arco floor lamp by Castiglioni in Blender 3D

A very good practice that I always recommend to my students is to model pieces of furniture in your spare time. Every time I have a few time available I open up Blender 3D and start to work on some furniture models. If you do that for a while, I a few weeks you will have a great set of models to use in your projects. Today I will show how to model great piece of design furniture, which is the Castiglioni Arco floor lamp. This is a very elegant and modern lamp that appears today in a lot of interior design projects, especially at the living room.
Well, the first thing we have to do before start to model this object is find some reference images, which you can find with the help of Google. Save an image with a side view of the Arco lamp and place it as the background of the 3D View in Blender. To show the modeling process in a faster way, I have created a timelapse video, with the full modeling and the rendering created in LuxRender.
Modeling an Arco Floor lamp in Blender 3D and LuxRender from Allan Brito on Vimeo.
As you can see by the video, the modeling of an Arco Lamp requires only the traditional poly modeling tools of Blender, which are the extrude and spin basically. Something that I always do to work with curved models, create a reference object and subdivide it to find a middle point. It makes the alignment of the 3D Cursor to the center of rotation of the arc a lot easier.
The base of the lamp requires a bit of extra work, because of a hole at the object. Since this part doesn't show up much and it's almost all the time hidden by a sofa or other piece of furniture.
This is the final result of model rendered in LuxRender for about an hour.
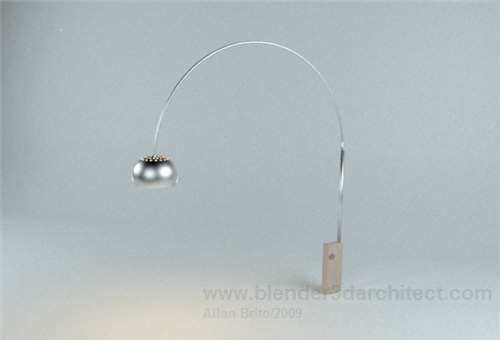
The studio setup really helps with the glossy reflections from the metal parts of the Arco Lamp.
Well, if you want to check out the model here is the Arco floor lamp file to download.
Comments
Arkinauta
As always, fantastic. Thanks, Allan.
I will follow your tip about modelling our furniture.
Greetings!
Roger Waggener
While the background image is quick and easy, I’ve found a far more robust method of using a reference image is to create a UV mapped reference plane.
Add a new plane, UV map the reference image to the whole of the plane. Then the trick is to add a material to the plane using the image as a texture and UV for the mapping.
The image will appear distorted on the plane (unless it was square to begin with) but simply typing alt-v in object mode with the plane selected will scale its aspect ratio to the image. Now you have a reference plane which can be rotated, translated, and scaled to make modeling easier.
kikeonline
can someone tell how did he do the arc?????????????????
Allan Brito
Hi kikeonline,
To create the arc, use the Spin tool.
James Bergin
Hey,
Thanks for the tutorial, awesome modelling tips.
PS: random question, whats the name of the bkg music?
Thanks again Allan,
James
Perspect Designs
Hi Allan,
Thanks, a great tut
Definitely vray quality.
and a small question
Lux render settings seem to vanish when opened in New version of blender (2.6). Any Idea?
How can these settings be retrieved? Highly eager to know settings (lights, glossy metals and render settings).
@kikeonline – How he created the ark
1. create an edge spanning from the start of the arc to the end (this will be the diameter of the arc)
2. then subdivide once (see mesh tools in the left hand side – under ‘add’) then snap the cursor to the middle vertex (this will be the center of the ark)
3. and then spin the faces – cross section of the ark – (again in the mesh tools) with 180 degrees (in a view that is normal to the plane of the ark) and set segments to 42
Thanks again Allan
(Sorry for bad English)
Anju
My question is: How did you make the ark, using vertices from the cylinder or vertex from the line segment? When I tried spin tool. It went very high and I can’t find why? My blender version is 6.63a
Thank you