
Getting started with YafaRay and Blender 3D for interior design

I still believe that we may use both YafaRay and LuxRender in our architectural visualization projects, because LuxRender can`t beat YafaRay in one tiny detail: render speed. The quality and realism of the images created with LuxRender are amazing, but they demand long render times to become clear enough to be used in commercial projects. Sometimes there is time available to wait, but what can we do if there isn’t time? In this case we can use YafaRay!
A new version of YafaRay is about to be released, which is version 0.1.1 with some improvements and bug fixes. By the messages on the YafaRay forums, there are some interesting features on development for YafaRay like the support for IES Lights and Irradiance Cache.
If you haven`t used YafaRay until today, I`m going to show you in this article the basic steps to setup an interior scene with Blender 3D and YafaRay. For this tutorial I have used YafaRay 0.1.1, which can be downloaded from this link. Just as a warning, to make YafaRay 0.1.1 work you have to uninstall all previous versions of YafaRay and even remove the old YafaRay scripts from the Blender scripts folder. At the first time I didn`t remove all references to old installations and my YafaRay wasn`t working properly.
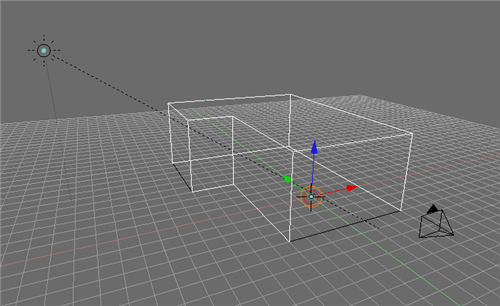
Well, the scene I`m going to use for this tutorial is quite simple and represents only a small room with two big openings.
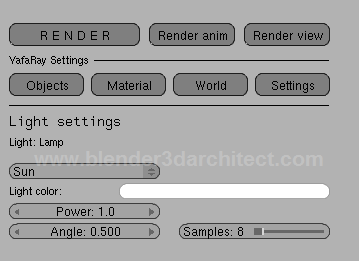
Right after the installation of YafaRay we will be able to use the export script, available at the Render folder of the scripts window. Open this script and we will see the exporter interface. It works in a very similar way than LuxBlend. We select an object to edit properties such as materials or other options.
For instance, select the Sun Lamp and click on the object tab and choose Sun as the light type.
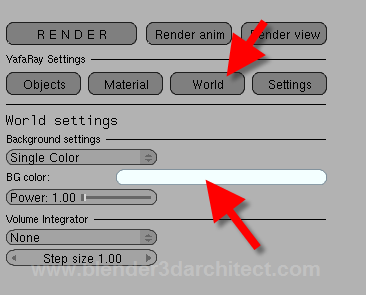
The next step is to set the background color in the world tab. Just set the color to a light blue color.
And finally we will get to the render settings. This is one of the most important parts of the YafaRay setup, because it`s here that we will actually make the render looks cleaner and realistic. The best render method for this scene is Photon Mapping, which is a good choice for all interior rendering.
Here are the other settings for the scene:
- Photons: 900000
- Diff. Radius: 20
- FG Samples: 100
- Use Background: On
- AA Passes: 3
- AA Samples: 12
From all those settings, you have to take care on with the total number of photons to increase the quality of the light. Another important thing is the Diff. Radius. If this value is set too low, we will have artifacts on the corners of the walls. And the FG Samples that will create a clean render with low levels of noise.
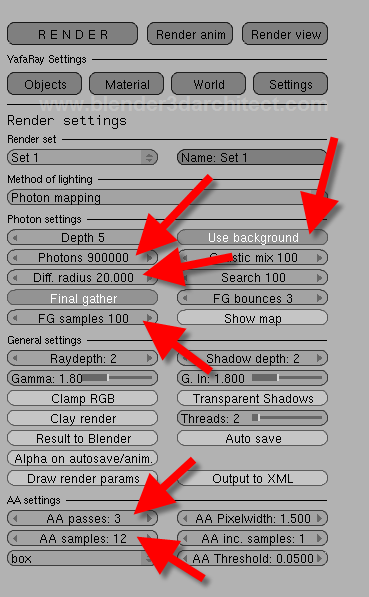
The AA settings will improve the anti-aliasing of the image.
With everything set, just hit the render button in YafaRay to get an image like the one showed below.
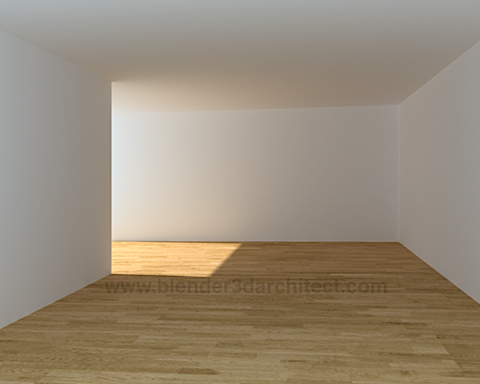
This image was rendered with only a few minutes! Now you know how to start working with YafaRay to render your projects. Expect more tutorials about it in the future.
Just a quick note about the materials, for all surfaces of the model I have use a standard diffuse material of YafaRay, but you can use any material you like.
Comments
Arkinauta
Thanks for the tutorial Allan.
I´m happy to see you will make more Yafaray tutorials.
I´ve seen the quality of Luxrender, but I´m always in a hurry with my architecture works (and I think I´m not the only one), so I prefer Yafaray for rendering my works.
Greetings.
Allan Brito
With a tight deadline we can`t afford long render times for some projects. In this scenario, LuxRender is not the best option.
I`m glad that you like the tutorial! 🙂
Thomas Baron
More used to modeling and rendering cars, I’m new to the interior scene. This tutorial have been really helpful to achieve better quality for my current test than what I did by myself.
Thanks !
Alejandro Soto
Just yesterday I downloaded Yafaray, and i felt lost, because I never have use it, and today i see a great starting point to learn the use of this renderer.
It´s great that you teach us someting everyday (or at least from monday-saturday).
Thanks a lot.
Allan Brito
Hi guys,
I`m glad to know that the tutorial is helping in the use of YafaRay.
@Alejandro: On sunday I usually take some time to sleep 🙂
Regards
Arnie
Allan, how do you see the use of Blender internal render for Interior Design? Do you think it is enough for good quality renders? What you miss the most?
Thanks!
Allan Brito
Hi Arnie,
I believe that you can create some great work with the Blender internal render, but I still miss some features. For instance, the support for IES lights, image based light with HDRI and the use of advanced GI like Photon Mapping. Some of those features are in development, but for now we can only rely on external renders.
Regards
sfepa
great! i hope there will be continuation with more tricks!
thanx a lot!
nige777
Great tute Allan, as usual :-)- Yaf + Lux = Flexibility and choice IMHO
Mehboob Sadicote
Hi, I have taken the precaution of removing all scripts and folders related to Yafray before installing YafaRay 0.1.1,as advised here, (http://www.blender3darchitect.com/2009/06/getting-started-with-yafaray-and-blender-3d-for-interior-design/) yet the Yafaray export option is not available to me in the Scripts–>Render Menu. All i can see is ‘Save Render options…’
Mehboob Sadicote
Sorry, pasted here by mistake
orion_uk
Hi there, I just wanted to say thank you so much for giving us access to all these tutorials (and thank you for all your hard work). I have dabbled in Blender on and off (mostly off due to the GUI) for a while now, nothing ever came out right or “fitted” together..Untill now. Thanks to your tutorials things are starting to move along and I feel like I am actually progressing ;)You go to alot of effort and by adding the screen captures/images it makes things so much easyier to relate to what is “meant” to happen on the screen. I guess you are a great believer in the old saying “a picture is worth a thousand words”. My website is off line at the moment due to the arrival of my beautiful baby girl so it is on the back burnner!
Any ho, thank you, I look forward to many more tutorials from you, keep it up, warmest regards :>
Yaroslav_L
Hello.
What scaling system do U use?
I’m asking about it, because “Diff radius” is sensetive to scaling…
And try to get so clear render without so much light coming from outside.
Your scene is unreal for interior lighting studing.
Sorry, but this is true!
I always fighting with lighting and noise to.
Regards.
kadri
hi everybody,
thaks so much for tutorials, firstly sory for my english.
Im interesting with blender nearly for 2 years but yafaray new.your tuts are very usefull yesterday i try to do this scene but my render not good as if yours 🙁 my scene’s so darkness and noisy. can you give tuts scene files download link please. thaks.